How To Upload Node.js App To Aws
It took me the better part of a month to figure out how to setup an Amazon Web Services (AWS) account, configure a Node.js app for deploying, and then actually deploy it.
A lot of that was trying to decipher Amazon's documentation. Hopefully this guide will get you on the road to deploying from local to live without too much of a headache.
I am located in Los Angeles, so when you're setting up your configuration the defaults may not be exactly the same.
Prerequisites
- Basic command line knowledge
I'm sure you can do this without the command line, but it's way easier to use the CLI - An AWS account
- The Elastic Beanstalk Command Line Interface (EB CLI)
Instructions on installation below - Basic knowledge of Git
Setting up an AWS Account
The first thing you have to do is setup an AWS account. If you already have an account, make sure you have an IAM user that has API keys and the appropriate access.
Create an Account
Pretty straightforward. Create an account. The signup process should walk you through everything pretty easily. When you first setup an AWS account, you'll get root access. However, it's security best practices to create a separate user that you will use to login regularly.
Setup your IAM
NOTE: I am not an expert with AWS Identity and Access Management (IAM). The actions I took were for my own personal use case and may not be suitable for your needs. Review the permissions thoroughly before giving users access.
AWS publishes best practices regularly, get one from 2016 here.
Setup a group
Before you setup a user for you to login with, create a group that will manage permissions. In my case I setup a SuperAdmin group that I was going to put myself into so I could have access to everything.
For this group, since it's basically to login and have access to everything myself, I chose AdministratorAccess as the permission.

For more info on IAM Groups, go here.
Setup an IAM User
Setting up a user is pretty simple, but if you get stuck, checkout the IAM page for AWS. They have a lot of useful videos.
Just remember to:
- Give them access key permissions
(see picture below) - Assign them to the appropriate IAM group

Once you've got your own user setup, log out of the root and log back in as your new IAM user.
Setting up the Local Environment
Now that we have our account keys ready, let's get started with the deployment.
What is Elastic Beanstalk?
Elastic Beanstalk (EB) is a fairly straightforward way of setting up scalable applications. It uses Amazon Elastic Compute Cloud (EC2) instances, Amazon Simple Storage Service (S3) buckets, and load balancers to manage your application architecture for you.
If you need to scale up quickly because of network demand, it'll do so. It's also really amazing at pushing updates because it can do "rolling updates", which allow the application to stay online while you update. Neat.
How to keep Elastic Beanstalk from costing you a ton
This only applies to new users that still qualify for the free plan:
- You get 750 hours of t2.micro EC2 time per month. This will give you enough to run a single server full time.
However, if you add one more sever, you're gonna pay for it. - You could switch over all your server logic to Lambda functions, but that is a topic for another day (and also there are a few drawback)s.
If you're interested, check out this article.
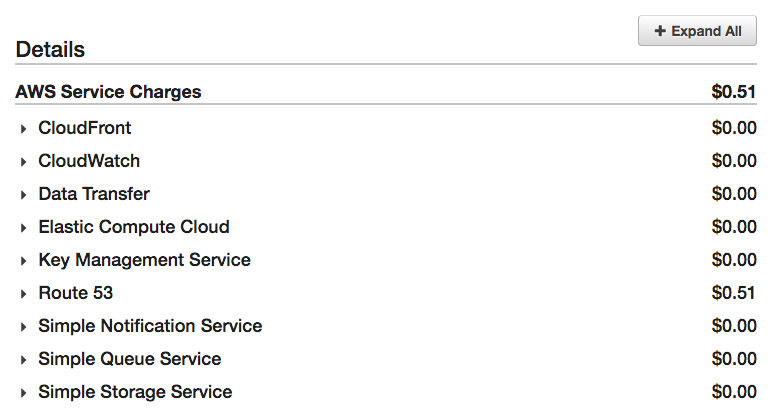
How much is going to cost though?
Good question. Here's a sample of my bill. This is with the Node.js application running that I'm writing this article about (EB, Cloudfront, S3 Buckets).

If you're wondering how much it will cost after the free plan is up, check this out.
Creating an EB Environment within your application
This is not a Node.js tutorial, as that is outside the scope of this article. But if you need an application to screw around with, check out the Express application generator. It'll give you a "Hello World," at least. It's what I used as the init for my project.
Moving forward, it's assumed you already have a Node.js application that runs locally without issue.
Setting up the EB CLI
First thing is to get the AWS/EB CLI running, which just consists of installing a couple of tools and setting up the configuration.
The AWS docs do a better job of explaining it than I ever could, so check them out here.
Note: If you ever have issues with the API Keys, you can verify/change them by editing the config file.
open ~/.aws/config Initial deployment
Now we've got all our tools in line, what next?
eb init When you run this command it's going to ask you a ton of questions:
- You'll be asked to choose a region.
Default is us-west-2 : US West (Oregon) - It'll ask you which application to use or create a new one.
The first option should be to create a new one. - It'll ask you if you want to use AWS CodeCommit.
I have no experience with this, but I am just using GitHub, so I said no.
Setup your Env variables
This was probably my biggest pain point. I don't know if my brain glazed over the documentation, or what. Once I figure it out though, it's actually really simple. And the config files are written in YAML ❤️.

When you eb init , it will create a folder .elasticbeanstalk in your root directory. You don't really have to mess with anything in here, as it should be setup automatically when you run the command the first time.
However, in order to have your environment variables, and any other configuration you need to be run at start time, create a new folder: .ebextensions
The folder structure should look something like this:
- .ebextensions -- 01_yourconfig.config - .elasticbeanstalk -- config.yml The config files are written in YAML, as mentioned earlier. To give you an idea of what they should look like, here are a few samples:
Environment variables file:
# 01_envar.config option_settings: aws:elasticbeanstalk:application:environment: PORT: 8081 NODE_ENV: production A file for configuring Node.js:
You don't really have to specify the NodeVersion because it will give you the latest one it can on the EC2 instances. But it's here just in case.
# 02_nodecommand.config option_settings: aws:elasticbeanstalk:container:nodejs: NodeCommand: "npm run start" NodeVersion: 8.8.1 This is the easiest way for me to manage the config settings, but they can be adjusted in the EB dashboard under configuration.
If you want to know more, here is an amazing article about just that topic.
Create an environment
eb create <env-name> then deploy
eb deploy Assuming all went well, your app is now deployed to the "cloud."
Check it out with eb open
Deploying changes
Once you get everything setup, pushing changes is super easy.
NOTE: Changes must be committed to Git before pushing to the environment.
I didn't realize that the first time, and it took me forever to figure out. Don't make the same mistake — commit those changes!
So, once you committed the changes, simply type in the command below and wait for it to run its course.
eb deploy <env-name> Other handy EBCLI commands
To open up the instance within the terminal, which is considerably easier than trying to remember the dictionary of a URL that AWS gives you at first:
eb open To open the console:
eb console To get log files straight to your terminal:
eb logs What's Next?
Custom domain name
If you run eb open you will notice that the URL is a crazy long URL. If you want to, you can hook it up to your domain using Route 53. For the most part that is all standard DNS record stuff. You can leave the DNS management wherever you registered your domain, but I just find it easier to have it all in once place.
SSL Cert
Getting a SSL cert for your instance is pretty easy too. Visit the certificate manager and create a new certificate for your domain. This is a simple process, too.
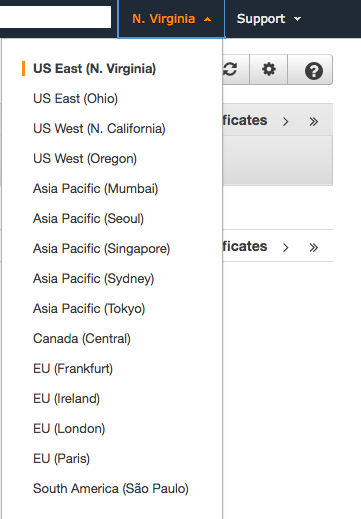
Note: If you plan on using an SSL cert for Cloudfront, you have to initiate the process from the N. Virginia zone. You can change your zone at the top right of the screen.

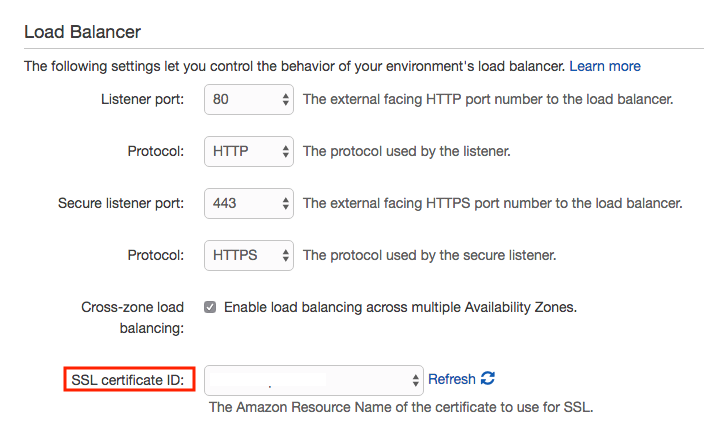
Once it's verified and ready to use, throw it in your EB config. The easiest way is to go to the console and select it.
- Go to your EB dashboard
- Choose your application
- Choose your environment
- Click on "configuration" and choose the SSL certificate.

Another Note: Sometimes you might have issues with the certificate manager if you have a brand new account. If it tells you to contact customer support when you try to create a certificate, do that and they'll fix it.
Conclusion
Wow. What a ride. Hopefully you were successful and didn't have to run to the AWS docs too many times. But, if I'm being honest with myself, I'm sure you had to at least once. AWS is a monstrous service and it only grows larger by the day.

Support
Did you enjoy this article? Would you like to see more? Have a couple bucks to spare? Check out the link below. Every cup of coffee is turned into another few hundred lines of code :)
Buy Jared Nutt a Coffee - BuyMeACoffee.com
Los Angeles based Web Developer trying his best to contribute to open source software and write great tutorials.buymeacoff.ee
Resources
AWS In plain English
Getting to Know and Love AWS Elastic Beanstalk Configuration Files (.ebextensions)
Getting Started with AWS
acloudguru (Not a free service, however they do have an intro course that is free and very informational)
Learn to code for free. freeCodeCamp's open source curriculum has helped more than 40,000 people get jobs as developers. Get started
How To Upload Node.js App To Aws
Source: https://www.freecodecamp.org/news/how-to-deploy-a-node-js-app-to-the-aws-elastic-beanstalk-f150899ed977/
Posted by: irvinhaster.blogspot.com

0 Response to "How To Upload Node.js App To Aws"
Post a Comment